- Injection mold tooling cost is set mostly by part size, cavity count, steel grade, the number of moving features and the surface finish.
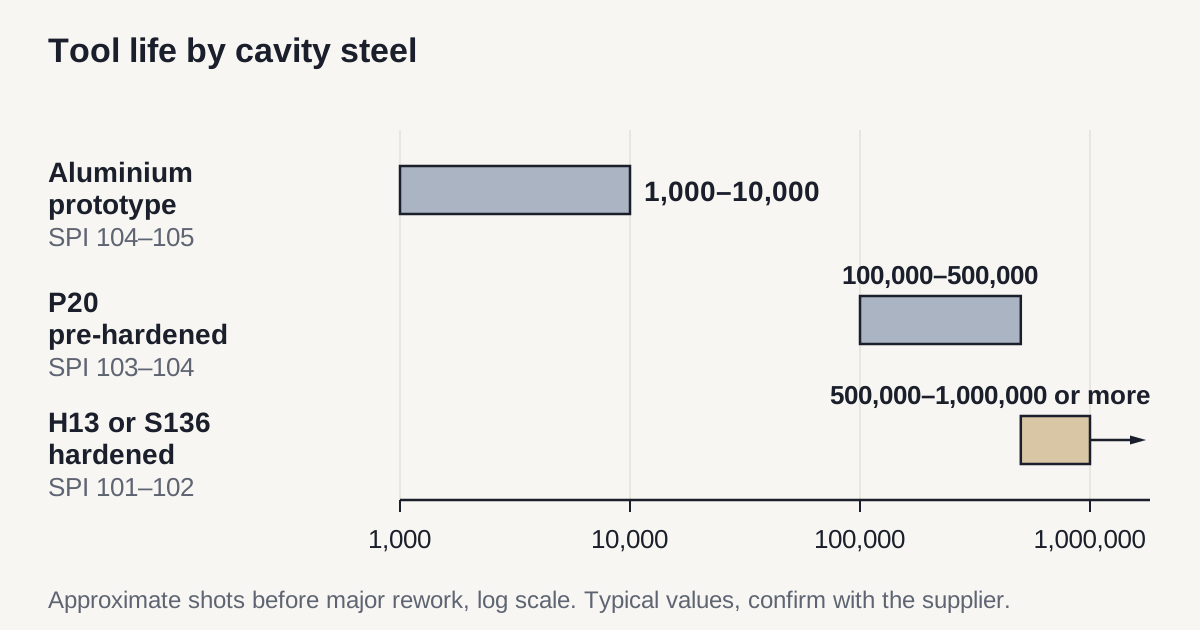
- Steel choice decides tool life: aluminium suits a few thousand shots, pre-hardened P20 suits mid volumes and hardened steel suits very long runs.
- More cavities cost more up front but lower the unit price once volumes are steady, so size the tool to the forecast and not to the best case.
- Ask who owns the mold, where it is built, where it is stored and what happens to it if you move the product.
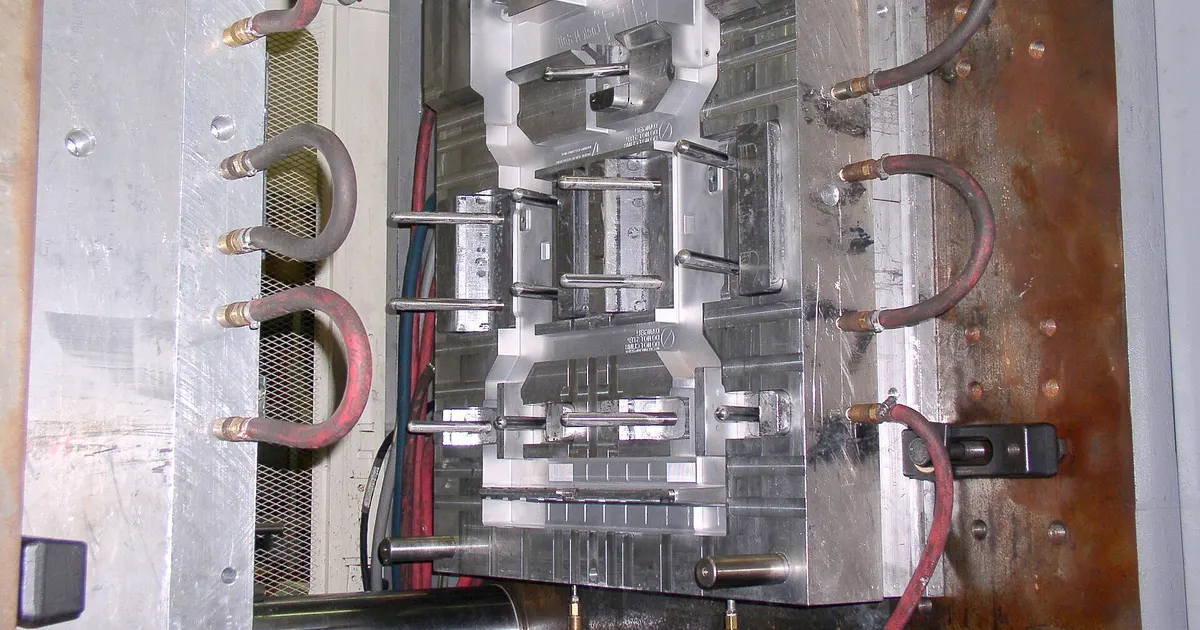
Tooling is the largest one-time cost in most plastic ODM projects, and the quote is the first place where two factories look very different. One number may be twice the other for the same part. The gap rarely means one factory is padding the price. It usually means the two quotes describe different molds, with different steel, cavities, cooling and expected life.
This guide explains what sits inside an injection mold quote so you can compare like with like. It extends the budget view in what an ODM project costs and focuses on plastic parts, which cover most consumer ODM categories.
What you are paying for in a mold
An injection mold is a pair of machined steel blocks that closes around a cavity shaped like your part. Molten resin is injected, cooled and ejected. The price of the tool comes from five parts:
- Steel and machining. Material for the cavity, core and mold base, plus CNC milling, EDM and polishing time.
- Design work. Mold flow review, gate position, cooling layout and the DFM report that comes back to you before steel is cut.
- Mechanisms. Slides, lifters, unscrewing cores and ejector systems for undercuts and threads.
- Surface. Polish grades and chemical texture on the cavity face.
- Trials. Machine time, resin and labor for T1 and later sample shots.
Larger parts need larger mold bases, so size alone moves the price quickly. A tool for a hand-sized housing is not a scaled-up version of a bottle cap tool.
Steel choice and tool life
The cavity material sets how many good parts the tool can make. The table gives typical ranges. The class numbers follow the SPI mold class system, which grades molds by expected cycles. Confirm the exact class and steel in the quote.
| Cavity material | Typical hardness | Typical tool life (shots) | Best for |
|---|---|---|---|
| Aluminium 7075 or 6061 | Soft | About 1,000 to 10,000 | Prototype runs, market tests, bridge tooling |
| P20 pre-hardened steel | About 28-32 HRC | About 100,000 to 500,000 | Most consumer products at mid volume |
| H13 hardened steel | About 48-52 HRC | 500,000 to 1,000,000 or more | High volume, glass-filled resins |
| S136 or 420 stainless, hardened | About 48-52 HRC | 500,000 to 1,000,000 or more | Clear parts, polished faces, corrosive resins |
Resin matters as much as steel. Glass-filled nylon or PC wears the cavity much faster than unfilled PP. If your part uses a filled grade, say so in the brief, because it can change the steel recommendation. Material choice is covered in ABS, PP and PC compared.
Match the steel to your forecast, not to your hope. A brand that expects 5,000 units in the first year gains little from a hardened tool built for a million shots. A brand with a proven product and a two-year plan of 200,000 units should not accept aluminium.
Cavity count: one, two, four or more
A cavity is one impression of the part. A four-cavity mold makes four parts per cycle. The tool costs more, but the cost per part falls because the machine time is shared.
Two things limit the choice:
- Machine size. More cavities need a larger clamping force and a bigger machine, which has a higher hourly rate.
- Forecast. If annual demand is 20,000 pieces, a single cavity running one shift finishes the year without strain. Extra cavities only add upfront cost.
Many ODM projects start with a single or two-cavity tool and add cavities when volume proves out. This works only if the first mold base was designed with space for the later insert, which is a point to raise during DFM.
Family molds, which make different parts in one tool, look cheap but often cause trouble. The parts fill and cool differently, so one part tends to set the cycle for all. Use them for small accessory sets, not for the main housing.
To see how tooling spread over a run changes the unit cost, read NRE charges in ODM projects; the whole budget is in ODM manufacturing cost.
Features that raise the price
Four features account for most of the jumps between similar-looking parts.
- Undercuts. Side holes, snap hooks and internal ribs that block a straight pull need slides or lifters. Each mechanism adds steel, machining and a point of wear.
- Texture. A chemical texture or leather grain is applied after machining. It adds cost and lead time and cannot be changed easily later.
- Hot runner. A heated manifold removes the cold runner waste and shortens the cycle. It adds cost to the tool, and pays back only at medium to high volume or with expensive resin.
- Tight tolerances or cosmetic surfaces. High-gloss faces, flush fits and assembly with other parts require more polishing and more trial rounds.
Ask the factory to list which of these features they priced. If one quote has no slides and another has three, you are not comparing the same part.
Send a brief Send your brief
Typical price ranges
These indicative ranges, in US dollars, give a sense of scale. Real quotes vary with the factors above.
| Tool type | Example | Indicative range |
|---|---|---|
| Aluminium prototype tool | Small enclosure, 1 cavity | About $2,000 to $10,000 |
| Small P20 tool | Cap or clip, 1 to 2 cavities | About $3,000 to $12,000 |
| Mid-size P20 tool | Housing with slides, 1 cavity | About $12,000 to $50,000 |
| Hardened multi-cavity tool | Small part, 4 to 8 cavities | About $20,000 to $80,000 |
| Large or multi-material tool | Appliance body, two-shot | $50,000 and above |
Treat the table as a sanity check only. A quote far below the range deserves a question about steel and trials. A quote far above deserves a question about what was added.
Where the tool is built and who owns it
Some Vietnamese factories build molds in-house, others buy them from tool shops in Vietnam and a few import tools from shops in other countries. Each route can work. What matters is that you know the route, because it sets lead time, the speed of fixes and the location of the tool drawings.
Put four points in writing before you pay the tooling deposit:
- Who owns the mold, and the release terms if you move production.
- Where the tool will be stored and how it is marked with your name and a serial number.
- Maintenance responsibility, including who pays for routine cleaning and wear parts.
- Delivery of the mold drawing package and the expected shot life.
Ownership terms interact with design rights. Read who owns the design in an ODM project before you sign.
Tool trials and changes
Tool building usually takes 4 to 8 weeks for a simple mold and longer for complex ones. The first shots, called T1, rarely give a perfect part. Expect one or two correction rounds for dimensions, warp or surface marks.
Steel can be removed easily but is hard to add back. If a wall must be thicker, the toolmaker removes steel from the cavity. If a wall must be thinner, steel has to be welded and re-machined, which risks tool life. Because of this, a good ODM factory leaves “steel safe” on the first cut when a dimension is uncertain. Ask whether the quote includes correction rounds, and how many.
Changes after approval go through a change order, covered in engineering change orders in ODM projects.
Maintenance and storage
A mold is a working asset, and it needs care between runs. Vents clog with resin residue, slides need lubrication, ejector pins wear and bare steel rusts when it sits idle in a humid warehouse. Ask the factory how it maintains tools: whether it keeps a shot counter, what it cleans after each run, how it protects the cavity when the mold is stored and who pays for wear parts. A written maintenance log is a good sign. A factory that cannot show one is likely to find out about wear from a bad batch.
Ask where the tool will live between orders. A mold stored in a clean rack with your name on it is a different risk from one stacked outside a workshop.
Checklist for comparing quotes
- Same drawing revision on every quote.
- Cavity steel grade and hardness named.
- Cavity count and expected tool life in shots.
- Slides, lifters and texture listed.
- Hot runner or cold runner stated.
- Number of trial rounds and cost of extra rounds.
- Mold ownership and storage terms.
- Lead time for T1 samples.
Next step
Prepare a brief with the drawing, resin, first-year forecast and target market. Then send your brief. We reply within 24 business hours and match you with up to 3 Vietnamese ODM factories that fit your product. You then compare tooling quotes with them directly.
Frequently asked questions
How much does an injection mold cost?
A small single-cavity mold in pre-hardened steel often falls in the low thousands of US dollars, while a mid-size housing with slides and lifters can run well into five figures and large multi-cavity or multi-material tools cost more. These are indicative ranges only. The quote depends on part size, steel, cavities, texture, hot runner and the factory's tooling source, so compare at least two quotes written to the same drawing.
How many parts can a mold make before it wears out?
It depends on the cavity steel and the resin. An aluminium prototype tool may last a few thousand shots, a pre-hardened P20 tool often runs hundreds of thousands and a hardened tool steel can run past a million. Glass-filled resins wear steel faster than unfilled ones. Ask the toolmaker for the expected shot life in writing, tied to the steel named in the quote.
Who should own the mold in an ODM project?
For a product developed only for your brand, buyers usually pay for the tool and ask for ownership in the contract, with the tool marked, photographed and kept at the factory under a written release clause. For a shared factory platform the mold may stay with the factory and you pay a smaller fee. Settle this before the deposit, using the points in the design ownership guide.
Can I move a mold to another factory later?
Usually yes, if the contract says the mold is yours, the factory has recorded the tool drawings and the release terms are clear. Moving a tool costs transport, a new trial and sometimes modifications for a different machine size. Ask early about the machine tonnage the mold was designed for and request the mold drawing package at tool completion.